Flutter-Firebase Authentication with Email and Password
Flutter App Development Tutorial | Part - VII

I am no longer publishing through HashNode. I have started my own publication Script Portal: https://medium.com/script-portal.
You can also find my video tutorials on my coding Channel: Coding With Nibesh: https://www.youtube.com/@codingWithNibesh
Authenticate Users in a Flutter Application with Firebase. Make use of Firebase Functions and Firestore Collections to store user information.
About
Hello! and welcome to the 7th blog in the series Flutter App Development Tutorial. I am Nibesh Khadka from Khadka's Coding Lounge. In the last two blogs, we created a Login/Register UI and Set-Up connection of our Flutter project to the Firebase project. Apart from them, we have also already made a Splash Screen, some global widgets like the app bar and bottom nav bar, and also implemented a global theme for the app we're making.
By the end of the blog, we'll be able to authenticate users in our app. Before that, you can find the progress so far in this folder of the repo.
Authentication Using Email and Password
Redirect Router On Authentication Status
Our user-screen flow is such that after onboarding we check if the user is authenticated or not. If not go to the authentication screen else go to the homepage. So, we have to tell the router to redirect on authentication status changes.
Let's do so on our app_router file. We'll have to make changes inside the redirect method of Go Router.
...
redirect: (state) {
       ....
        // define the named path of auth screen
        // #1
        final String authPath = state.namedLocation(APP_PAGE.auth.routeName);

        // Checking if the current path is auth or not
        // # 2
        bool isAuthenticating = state.subloc == authPath;


        // Check if a user is logged in or not based on userLog Status
        // #3
        bool isLoggedIn =
            FirebaseAuth.instance.currentUser != null ? true : false;

        print("isLoggedIn is: $isLoggedIn");

        if (toOnboard) {
          // return null if the current location is already OnboardScreen to prevent looping
          return isOnboarding? null : onboardPath;
        }
        // only authenticate if a user is not logged in
         // #4
        else if (!isLoggedIn) {
          return isAuthenticating ? null : authPath; // #5
        }

        // returning null will tell the router to don't mind redirecting the section
        return null;
      });
So, what we did was:
- We defined a named path for the authentication screen.
- Similarly, a boolean to check if the app is en route to auth screen already.
- FirebaseAuth.instance.currentUser returns the status of the current user: null if absent(logged out mostly), true if logged in.
- If the user is absent then redirect from whatever route currently you're now to the authentication route.
- Unless the current route is already an authentication route then return null. You see if you don't check the current route, then the router may enter an infinite loop.
Firebase User Authentication In With Email and Password
We are using Local Emulator. But in case you're using Firebase Cloud, then first you will have to go to the firebase console of your project, then enable Email/Password SignIn from the Authentication.
Now, on the auth_providers file from screens/auth/providers we'll add authentication functions.
Import the following files
import 'package:cloud_firestore/cloud_firestore.dart';
import 'package:firebase_auth/firebase_auth.dart';
import 'package:flutter/material.dart';
import 'package:go_router/go_router.dart';
import 'package:temple/globals/settings/router/utils/router_utils.dart';
Create Class and Instantiate
Let's create AuthStateProvider Class and instantiate FirebaseAuth.
class AuthStateProvider with ChangeNotifier {
  FirebaseAuth authInstance = FirebaseAuth.instance;
}
Registration with Email and Password
Write a Registration method.
  // Our Function will take email, password, and username and buildcontext
 // #1
void register(String email, String password, String username,
      BuildContext context) async {
    try {
      // Get back usercredential future from createUserWithEmailAndPassword method
    // # 2
      UserCredential userCred = await authInstance
          .createUserWithEmailAndPassword(email: email, password: password);
          // Save username name
      await userCred.user!.updateDisplayName(username);

    // After that access "users" Firestore in firestore and save username, email and userLocation
     // # 3
      await FirebaseFirestore.instance
          .collection('users')
          .doc(userCred.user!.uid)
          .set(
        {
          'username': username,
          'email': email,
          'userLocation': null,
        },
      );

      // if everything goes well user will be registered and logged in
      // now go to the homepage
      // #4
      GoRouter.of(context).goNamed(APP_PAGE.home.routeName);
    } on FirebaseAuthException catch (e) {
      // In case of error
      // if email already exists
      // # 5
      if (e.code == "email-already-in-use") {
        print("The account with this email already exists.");
      }
      if (e.code == 'weak-password') {
        // If password is too weak
        // #6
        print("Password is too weak.");
      }
    } catch (e) {
      // For anything else
      // #6
      print("Something went wrong please try again.");
    }
  // notify the listeneres
       notifyListeners();
  }
Let's go over the details:
- Our function will take in the email address, password, username, and BuildContext. We'll need the build context for routing.
- We use the createUserWithEmailAndPassword method made available by FlutterFire.
- After registration of the user, we'll also write a new document in the 'users' collection on Firestore . Ignore the field userLocation for now. We will deal with that in upcoming parts.
If the operation is successful, then go to the home page. Firebase automatically logs in new users so we don't have to do that ourselves. Now, the currentUser is not null anymore, the router will redirect the user to the homepage.
(5 & 6) In case of errors send the user an appropriate message. Right now, we're just printing the message. Later, we'll implement a snack bar to display messages on the application screen.
Sign In With Email and Password
Now that, we've made our registration function, let's make the sign-in function as well.
 // Our Function will take email, password, and build context
  void login(String email, String password, BuildContext context) async {
    try {
      // try signing in
     # 1
      UserCredential userCred = await authInstance.signInWithEmailAndPassword(
          email: email, password: password);
      // if successful leave auth screen and go to the homepage
      GoRouter.of(context).goNamed(APP_PAGE.home.routeName);
    } on FirebaseAuthException catch (e) {
      // On error
      // If a user is not found
      if (e.code == 'user-not-found') {
        print("No user found for that email.");
      }
      // If password is wrong
      if (e.code == 'wrong-password') {
        print("Wrong password.");
      }
    } catch (e) {
      print("Something went wrong please try again");
    }
    // notify the listeners.
    notifyListeners();
  }
We're using the sign-in method from FlutterFire. Everything else is the same as in the registration method.
The Sign-Out Method
Sign-Out is a very basic and simple method.
  void logOut() async {
    await authInstance.signOut();
    notifyListeners();

  }
Putting All Pieces Together
Our AuthStateProvider Class looks like this now.
import 'package:cloud_firestore/cloud_firestore.dart';
import 'package:firebase_auth/firebase_auth.dart';
import 'package:flutter/material.dart';
import 'package:go_router/go_router.dart';
import 'package:temple/globals/settings/router/utils/router_utils.dart';

class AuthStateProvider with ChangeNotifier {
  FirebaseAuth authInstance = FirebaseAuth.instance;

 // Our Function will take email, password, username, and buildcontext
  void register(String email, String password, String username,
      BuildContext context) async {
    try {
      // Get back usercredential future from createUserWithEmailAndPassword method
      UserCredential userCred = await authInstance
          .createUserWithEmailAndPassword(email: email, password: password);
      // Save username name
      await userCred.user!.updateDisplayName(username);

      // After that access "users" Firestore in firestore and save username, email and userLocation
      await FirebaseFirestore.instance
          .collection('users')
          .doc(userCred.user!.uid)
          .set(
        {
          'username': username,
          'email': email,
          'userLocation': null,
        },
      );
      // if everything goes well user will be registered and logged in
      // now go to the homepage
      GoRouter.of(context).goNamed(APP_PAGE.home.routeName);
    } on FirebaseAuthException catch (e) {
      // In case of error
      // if email already exists
      if (e.code == "email-already-in-use") {
        print("The account with this email already exists.");
      }
      if (e.code == 'weak-password') {
        // If password is too weak
        print("Password is too weak.");
      }
    } catch (e) {
      // For anything else
      print("Something went wrong please try again.");
    }
    // notify listeneres
    notifyListeners();
  }

  // Our Function will take email, password and build context

  void login(String email, String password, BuildContext context) async {
    try {
      // try signing in
      UserCredential userCred = await authInstance.signInWithEmailAndPassword(
          email: email, password: password);
      // if succesfull leave auth screen and go to homepage
      GoRouter.of(context).goNamed(APP_PAGE.home.routeName);
    } on FirebaseAuthException catch (e) {
      // On error
      // If user is not found
      if (e.code == 'user-not-found') {
        print("No user found for that email.");
      }
      // If password is wrong
      if (e.code == 'wrong-password') {
        print("Wrong password.");
      }
    } catch (e) {
      print("Something went wrong please try again");
    }
    // notify the listeners.
    notifyListeners();
  }

  void logOut() async {
    await authInstance.signOut();
    notifyListeners();
  }
}
Add Provider To Widget Tree
Our first beta version of authentication functions is ready to be tested. So, let's first enlist our provider in the widget tree with MultipleProviders.
app
 providers: [
        ChangeNotifierProvider(create: (context) => AppStateProvider()),
         // Add authStateProvider
        ChangeNotifierProvider(create: (context) => AuthStateProvider()),
        // Remove previous Provider call and create new proxyprovider that depends on AppStateProvider
        ProxyProvider<AppStateProvider, AppRouter>(
            update: (context, appStateProvider, _) => AppRouter(
                  appStateProvider: appStateProvider,
                  prefs: widget.prefs,
                ))
      ],
Handle Form Submission On Click
Let's now go to auth_form_widget file in lib/screen/auth/widgets/ . Here we'll have to write function that we'll get triggered on register/sigin button click. We'll call that function _submitForm(). Add this function right after the msgPopUp() method.
// Submit form will take AuthStateProvider, and BuildContext
// #1
void _submitForm(
      AuthStateProvider authStateProvider, BuildContext context) async {
    // Check if the form and its input are valid
   // #2
    final isValid = _formKey.currentState!.validate();

    // Trim the inputs to remove extra spaces around them
   // #3
    String username = usernameController.text.trim();
    String email = emailController.text.trim();
    String password = passwordController.text.trim();

    // if the form is valid
    // #4
    if (isValid) {
      // Save current state if form is valid
      _formKey.currentState!.save();

      // Try Sign In Or Register baed on if its register Auth Mode or not
      // #5
      if (registerAuthMode) {
        authStateProvider.register(email, password, username, context);
      }
    } else {
      authStateProvider.login(email, password, context);
    }
  }
Let's go over the details.
- Our function will take AuthStateProvider & Build Context as arguments.
- We can check if the form is valid with formKey.currentState!.validate().
- Trim the input to remove the extra spaces, if they exist.
- If the form/input is valid, then let's move on to authentication.
- Depending on the authMode we'll either register or sign in the user.
Instantiate Provider
Inside BuildContext let's first call the AuthStateProvider.
@override
  Widget build(BuildContext context) {
   // Instantiate AuthStateProvider
    final AuthStateProvider authStateProvider = Provider.of<AuthStateProvider>(context);
Assign Submission Handler
Let's go way down where our only ElevatedButton is and assign the _submitForm method.
 ElevatedButton(
                  onPressed: () {
                    // call _submitForm on tap
                    _submitForm(authStateProvider, context);
                  },
                  child: Text(registerAuthMode ? 'Register' : 'Sign In'),
                  style: ButtonStyle(
                    elevation: MaterialStateProperty.all(8.0),
                  ),
                ),
AuthForm Widget
Our auth_form_widget looks like this now.
import 'package:flutter/material.dart';
import 'package:provider/provider.dart';
import 'package:temple/screens/auth/providers/auth_provider.dart';
import 'package:temple/screens/auth/utils/auth_validators.dart';
import 'package:temple/screens/auth/widgets/text_from_widget.dart';

class AuthFormWidget extends StatefulWidget {
  const AuthFormWidget({Key? key}) : super(key: key);

  @override
  State<AuthFormWidget> createState() => _AuthFormWidgetState();
}

class _AuthFormWidgetState extends State<AuthFormWidget> {
  // Define Form key
  final _formKey = GlobalKey<FormState>();

  // Instantiate validator
  final AuthValidators authValidator = AuthValidators();

// controllers
  late TextEditingController emailController;
  late TextEditingController usernameController;
  late TextEditingController passwordController;
  late TextEditingController confirmPasswordController;

// create focus nodes
  late FocusNode emailFocusNode;
  late FocusNode usernameFocusNode;
  late FocusNode passwordFocusNode;
  late FocusNode confirmPasswordFocusNode;

  // to obscure text default value is false
  bool obscureText = true;
  // This will require to toggle between register and sigin in mode
  bool registerAuthMode = false;

// Instantiate all the *text editing controllers* and focus nodes on *initState* function
  @override
  void initState() {
    super.initState();
    emailController = TextEditingController();
    usernameController = TextEditingController();
    passwordController = TextEditingController();
    confirmPasswordController = TextEditingController();

    emailFocusNode = FocusNode();
    usernameFocusNode = FocusNode();
    passwordFocusNode = FocusNode();
    confirmPasswordFocusNode = FocusNode();
  }

// These all need to be disposed of once done so let's do that as well.
  @override
  void dispose() {
    super.dispose();

    emailController.dispose();
    usernameController.dispose();
    passwordController.dispose();
    confirmPasswordController.dispose();

    emailFocusNode.dispose();
    usernameFocusNode.dispose();
    passwordFocusNode.dispose();
    confirmPasswordFocusNode.dispose();
  }

// Create a function that'll toggle the password's visibility on the relevant icon tap.
  void toggleObscureText() {
    setState(() {
      obscureText = !obscureText;
    });
  }

// Let's create a snack bar to pop info on various circumstances.
// Create a scaffold messanger
  SnackBar msgPopUp(msg) {
    return SnackBar(
        content: Text(
      msg,
      textAlign: TextAlign.center,
    ));
  }

// Submit form will take AuthStateProvider, and BuildContext
  void _submitForm(
      AuthStateProvider authStateProvider, BuildContext context) async {
    // Check if the form and its input are valid
    final isValid = _formKey.currentState!.validate();

    // Trim the inputs to remove extra spaces around them
    String username = usernameController.text.trim();
    String email = emailController.text.trim();
    String password = passwordController.text.trim();

    // if the form is valid
    if (isValid) {
      // Save current state if form is valid
      _formKey.currentState!.save();

      // Try Sigin Or Register baed on if its register Auth Mode or not
      if (registerAuthMode) {
        authStateProvider.register(email, password, username, context);
      }
    } else {
      authStateProvider.login(email, password, context);
    }
  }

  @override
  Widget build(BuildContext context) {
    final AuthStateProvider authStateProvider =
        Provider.of<AuthStateProvider>(context);
    return Padding(
      padding: const EdgeInsets.all(8),
      child: Form(
        key: _formKey,
        child: Column(
          children: [
            // Email
            DynamicInputWidget(
              controller: emailController,
              obscureText: false,
              focusNode: emailFocusNode,
              toggleObscureText: null,
              validator: authValidator.emailValidator,
              prefIcon: const Icon(Icons.mail),
              labelText: "Enter Email Address",
              textInputAction: TextInputAction.next,
              isNonPasswordField: true,
            ),
            const SizedBox(
              height: 20,
            ),
            // Username
            AnimatedContainer(
              duration: const Duration(milliseconds: 500),
              height: registerAuthMode ? 65 : 0,
              child: AnimatedOpacity(
                duration: const Duration(milliseconds: 500),
                opacity: registerAuthMode ? 1 : 0,
                child: DynamicInputWidget(
                  controller: usernameController,
                  obscureText: false,
                  focusNode: usernameFocusNode,
                  toggleObscureText: null,
                  validator: null,
                  prefIcon: const Icon(Icons.person),
                  labelText: "Enter Username(Optional)",
                  textInputAction: TextInputAction.next,
                  isNonPasswordField: true,
                ),
              ),
            ),

            AnimatedOpacity(
              duration: const Duration(milliseconds: 500),
              opacity: registerAuthMode ? 1 : 0,
              child: const SizedBox(
                height: 20,
              ),
            ),

            DynamicInputWidget(
              controller: passwordController,
              labelText: "Enter Password",
              obscureText: obscureText,
              focusNode: passwordFocusNode,
              toggleObscureText: toggleObscureText,
              validator: authValidator.passwordVlidator,
              prefIcon: const Icon(Icons.password),
              textInputAction: registerAuthMode
                  ? TextInputAction.next
                  : TextInputAction.done,
              isNonPasswordField: false,
            ),

            const SizedBox(
              height: 20,
            ),

            AnimatedContainer(
              duration: const Duration(milliseconds: 500),
              height: registerAuthMode ? 65 : 0,
              child: AnimatedOpacity(
                duration: const Duration(milliseconds: 500),
                opacity: registerAuthMode ? 1 : 0,
                child: DynamicInputWidget(
                  controller: confirmPasswordController,
                  focusNode: confirmPasswordFocusNode,
                  isNonPasswordField: false,
                  labelText: "Confirm Password",
                  obscureText: obscureText,
                  prefIcon: const Icon(Icons.password),
                  textInputAction: TextInputAction.done,
                  toggleObscureText: toggleObscureText,
                  validator: (val) => authValidator.confirmPasswordValidator(
                      val, passwordController.text),
                ),
              ),
            ),
            const SizedBox(
              height: 20,
            ),

            Row(
              mainAxisAlignment: MainAxisAlignment.end,
              children: [
                TextButton(
                  onPressed: () {},
                  child: const Text('Cancel'),
                ),
                const SizedBox(
                  width: 20,
                ),
                ElevatedButton(
                  onPressed: () {
                    // call _submitForm on tap
                    _submitForm(authStateProvider, context);
                  },
                  child: Text(registerAuthMode ? 'Register' : 'Sign In'),
                  style: ButtonStyle(
                    elevation: MaterialStateProperty.all(8.0),
                  ),
                ),
              ],
            ),

            const SizedBox(
              height: 20,
            ),
            Row(
              mainAxisAlignment: MainAxisAlignment.center,
              children: [
                Text(registerAuthMode
                    ? "Already Have an account?"
                    : "Don't have an account yet?"),
                TextButton(
                  onPressed: () =>
                      setState(() => registerAuthMode = !registerAuthMode),
                  child: Text(registerAuthMode ? "Sign In" : "Regsiter"),
                )
              ],
            )
          ],
        ),
      ),
    );
  }
}
Calling Log Out
We haven't added the logout method. Let's do that inside the user_drawer file in lib/globals/widgets/user_drawer/. Also while we're here, let's remove that temporary authentication route.
import 'package:flutter/material.dart';
import 'package:go_router/go_router.dart';
import 'package:provider/provider.dart';
import 'package:temple/globals/settings/router/utils/router_utils.dart';
import 'package:temple/screens/auth/providers/auth_provider.dart';

class UserDrawer extends StatefulWidget {
  const UserDrawer({Key? key}) : super(key: key);

  @override
  _UserDrawerState createState() => _UserDrawerState();
}

class _UserDrawerState extends State<UserDrawer> {
  @override
  Widget build(BuildContext context) {
    return AlertDialog(
      backgroundColor: Theme.of(context).colorScheme.primary,
      actionsPadding: EdgeInsets.zero,
      scrollable: true,
      shape: RoundedRectangleBorder(
        borderRadius: BorderRadius.circular(15),
      ),
      title: Text(
        "Astha",
        style: Theme.of(context).textTheme.headline2,
      ),
      content: const Divider(
        thickness: 1.0,
        color: Colors.black,
      ),
      actions: [
        // Past two links as list tiles
        ListTile(
            leading: Icon(
              Icons.person_outline_rounded,
              color: Theme.of(context).colorScheme.secondary,
            ),
            title: const Text('User Profile'),
            onTap: () {
              print("User Profile Button Pressed");
            }),

        ListTile(
            leading: Icon(
              Icons.logout,
              color: Theme.of(context).colorScheme.secondary,
            ),
            title: const Text('Logout'),
            onTap: () {
              Provider.of<AuthStateProvider>(context, listen: false).logOut();
              GoRouter.of(context).goNamed(APP_PAGE.auth.routeName);
            }),
      ],
    );
  }
}
Now, the user can log out.
Firebase Functions: Cloud Firestore Triggers
Firebase provides background triggers, which get called automatically when an event it's attached to occurs. There are four triggers: onCreate, onUpdate, onDelete, and onWrite. We'll use the onCreate trigger when a new user registers to add a time-stamp field createdAt that records the time of registration. We'll write our function on the index.js file inside the functions folder.
index.js
// Import modules
// #1
const functions = require("firebase-functions"),
admin = require('firebase-admin');
// always initialize admin
// #2
admin.initializeApp();
// create a const to represent firestore
// #3
const db = admin.firestore();
// Create a new background trigger function
// #4
exports.addTimeStampToUser = functions.runWith({
timeoutSeconds: 240, // Give timeout // #5
memory: "512MB" // memory allotment // #5
}).firestore.document('users/{userId}').onCreate(async (_, context) => {
// Get current timestamp from server
// #6
let curTimeStamp = admin.firestore.Timestamp.now();
// Print current timestamp on server
// # 7
functions.logger.log(`curTimeStamp ${curTimeStamp.seconds}`);
try {
// add the new value to new users document
// #8
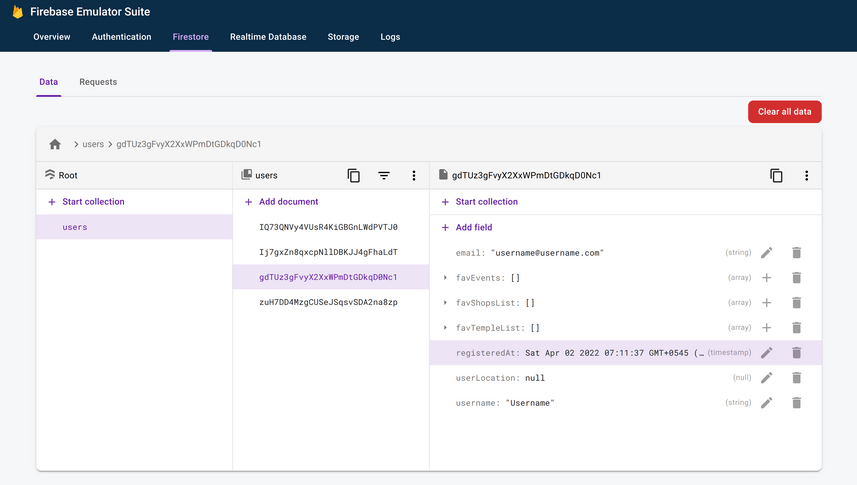
await db.collection('users').doc(context.params.userId).set({ 'registeredAt': curTimeStamp, 'favTempleList': [], 'favShopsList': [], 'favEvents': [] }, { merge: true });
// if its done print in logger
// #7
functions.logger.log(`The current timestamp added to users collection: ${curTimeStamp}`);
// always return something to end the function execution
return { 'status': 200 };
} catch (e) {
// Print error in case of errors
// #7
functions.logger.log(`Something went wrong could not add a timestamp to users collection ${curTimeStamp}`);
// return status 400 for error
return { 'status': 400 };
}
});
I hope readers are familiar with JavaScript and Node.js. Let's go over the important details on index.js.
- We import firebase functions and firebase-admin.
- Always remember to initialize admin.
- Create a constant to represent the Firebase Firestore.
- We create our first function, addTimeStampToUser which will get triggered whenever a new document is created inside the "users" collection.
- We can provide restrictions to a function with runWtih() method. It's important sometimes to just terminate function to free memory and to save ourselves from terrifying bills. But you have to experiment with it.
- We can get a time stamp from the server. Well, it's just a placeholder, not a time. Please read this nice article to find out more about it.
- We print the logs to see the progress.
- We can save new fields in a document with db.collection('collection_name').doc(documentId).set(value). Few things to point out here. Since the user is being created, there's no context.auth.uid, but we can get the new id to be, from context.params.id. Find out more on EventContext. Another thing, when you're updating/adding a new value, you have to provide merge options to make sure the new value doesn't overwrite the previous ones(email&username in our case).
You saw 'favTempleList', 'favShopsList', and 'favEvents' fields being added to the user document. Don't worry about it for now. These arrays will be filled later on in the series. On your emulator, you'll see these fields and logs when we register a new user.

If you want to deploy functions on the cloud, first you'll have to upgrade plans to the paid plan. When you're done upgrading use the following command to deploy functions.
firebase deploy --only functions
Watch this playlist from Google to understand more about Firebase Functions.

Summary
We did quite a few tasks in this blog. Let's retrace our steps:
- We set up the AppRouter to redirect to the authentication screen on the app launch if the user is not logged in.
- We created Registration, Login, and LogOut functions using the FlutterFire package.
- We also wrote a simple background trigger for Firebase Functions which will auto-save the time when a user registers on our app.
Show Support
Please give us feedback in the comments section. Do like and share the article with your friends who might benefit from it. Thank you for your time. In the next installment, we'll add features like Snack Bar, Alter Dialogs, and Progress Indicators to enhance our user experience on Authentication Screen. So, subscribe to get notified.
This is Nibesh from Khadka's Coding Lounge, a freelancing agency that makes websites and mobile applications.