Flutter Firebase Setup | Cloud & Emulator
Flutter App Development Tutorial - VI

I am no longer publishing through HashNode. I have started my own publication Script Portal: https://medium.com/script-portal.
You can also find my video tutorials on my coding Channel: Coding With Nibesh: https://www.youtube.com/@codingWithNibesh
Create Firebase Project; Connect the Firebase cloud project with a Flutter project from the Command Line Terminal; Install the Firebase and FlutterFire CLI; Set up Firebase locally with the local emulator suite.
Intro
Hello and welcome back, this is Nibesh Khadka from Khadka's Coding Lounge.This is 6th installment of the Flutter App Development Tutorial Series. So, far we have implemented a splash screen, onboard screen, global theme, and created custom widgets: app bar, bottom nav bar, and a drawer. In the last section of the series, we created a User Interface for authentication. We'll now connect the Firebase project with Flutter on the cloud as well as locally.
If you're not following the series and just want to set up a Firebase connection with flutter then go to the standalone blog.
Setting Up
The project source code until the last part can be found in this folder.
Create A Firebase Project
Please, create a Firebase project on the console. If you have never made a Firebase project then follow the instructions from this code lab by google.
Install Firebase CLI
We'll rely on FlutterFire package for our development. Configuring the FlutterFire package can be done with FlutterFire CLI. But FlutterFire CLI relies on the Firebase CLI.
Follow the instruction here to install and then login into the firebase account. No, need to initialize firebase now, we will do it later on after FlutterFire CLI configurations.
Install Dependencies
After the firebase CLI installation, before we link our project to the firebase project, we'll install some dependencies. On your terminal:
# Root of the flutter project
# Firebase core
flutter pub add firebase_core

# Firebase Auth
flutter pub add firebase_auth

# Firebase Firestore
flutter pub add cloud_firestore

# Firebase Cloud Functions
flutter pub add cloud_functions

# Firebase Storage
flutter pub add firebase_storage
We've installed Firebase Core, Firebase Auth, Firebase Cloud Functions, and Firebase Storage packages for flutter.
Install and Configure FlutterFire CLI
Let's install and configure flutter CLI on the terminal
# Install Firebase CLI
dart pub global activate flutterfire_cli

# On the root of your project
# configur cli
flutterfire configure
During the configuration process:
- You'll be asked to choose the right project from the list(if there are multiple).
- You'll also be asked to choose apps for the project. Chose only android and ios. You can select/deselect with the space bar.
- You'll be asked to provide the bundle id for IOS. I just gave the same one as android: com.example.flutterfirebase_practice.
Now we're done with flutter fire installation and configurations, and next, we need to initialize it.
Firebase Initialization
On the main.dart file of the project let's initialize firebase.
// Import
import 'package:firebase_core/firebase_core.dart';
import 'firebase_options.dart';

// Inside main() method

// Initialize Firebase
  await Firebase.initializeApp(
    options: DefaultFirebaseOptions.currentPlatform,
  );
Now our main.dart file should look like this.
import 'package:flutter/material.dart';
import 'package:flutter/services.dart';
import 'package:shared_preferences/shared_preferences.dart';
import 'package:temple/app.dart';
import 'package:firebase_core/firebase_core.dart';
import 'firebase_options.dart';

void main() async {
  //  concrete binding for applications based on the Widgets framewor
  WidgetsFlutterBinding.ensureInitialized();

// Instantiate shared pref
  SharedPreferences prefs = await SharedPreferences.getInstance();
  SystemChrome.setSystemUIOverlayStyle(
    SystemUiOverlayStyle.dark.copyWith(statusBarColor: Colors.black38),
  );
  // Initialize Firebase
  await Firebase.initializeApp(
    options: DefaultFirebaseOptions.currentPlatform,
  );

// Pass prefs as value in MyApp
  runApp(MyApp(prefs: prefs));
}
Set-Up Firebase Backend: Cloud and Emulator
We'll be writing a lot of code as backend, separate from our flutter side to keep it secure and clean. So, let's set up firebase separately for both cloud and emulators.
Reminder: Before we start configuration, make sure to create a Firestore database(on test mode) from the firebase console of the project you've created. Otherwise, you'll get an error during the process telling you there's no database created.
# On the root of your project
firebase init
- You'll be asked to choose from different Firebase products. Choose four: Firestore, Firebase Storage, Cloud Functions, and Emulators.
- Next, you have to choose the Firebase project or create one. Since we've already created one, chose the right project from the existing ones.
- Just press enter, on all the file options provided there.
- Select JavaScript as the language to use for firebase functions.
- Select 'y' for both linter and installations.
- During the process, you'll be prompted to Emulators settings. Here, please select four products: Authentication, Firestore, Storage, and Functions Emulators.
- Just press enter to select the default ports.
- Enter "Y" to enable emulator UI.
- Press enter for the rest.
Now, we've set up all the necessities. Wait there's still more, we still haven't linked the flutter project to Firebase Emulator Suite.
Connect Firebase Emulator Suite to Flutter Project.
To connect to the emulator we once again need to make some changes to the main.dart file.
Import required dependencies if you haven't already
import 'dart:io' show Platform; // Its required for emulator
import 'package:cloud_firestore/cloud_firestore.dart';
import 'package:cloud_functions/cloud_functions.dart';
import 'package:firebase_auth/firebase_auth.dart';
import 'package:firebase_storage/firebase_storage.dart';
Create Global Boolean
// Outside of any class or methods, before main()
const bool _useEmulator = true;
Connection Handler
Create a function that'll connect to the emulator with the required settings.
// Outside of main, preferably at the end of the file


// Settings for firebase emulator connection
Future _connectToEmulator() async {
  // Provide url to the emulator, localhost might not work on android emulator.
  final host = Platform.isAndroid ? '10.0.2.2' : 'localhost'; //#1
  // Provide port for all the local emulator prodcuts
  // #2
  const authPort = 9099;
  const firestorePort = 8080;
  const functionsPort = 5001;
  const storagePort = 9199;

  // Just to make sure we're running locally
  print("I am running on emulator");

  // Instruct all the relevant firebase products to use the firebase emulator
  // # 3
  await FirebaseAuth.instance.useAuthEmulator(host, authPort);
  FirebaseFirestore.instance.useFirestoreEmulator(host, firestorePort);
  FirebaseFunctions.instance.useFunctionsEmulator(host, functionsPort);
  FirebaseStorage.instance.useStorageEmulator(host, storagePort);
}
Let's go through the vitals.
- When running on an android emulator it's actually not localhost. So, it can give you errors so, check the platform and provide the right URL.
- Each firebase product will run on its port. So, provide the right port. You can find the port for all products in the firebase.json file.
- Instruct all the products to use Firebase Emulator if it's running.
Initalize Emulator On Main
Now, we need to call this function on the main() method right after you initialize firebase.
// Set app to run on firebase emulator
  if (_useEmulator) {
    await _connectToEmulator();
  }
Full Code
We're all set to use the emulator now. The final form of our main.dart is:
import 'dart:io' show Platform;
import 'package:cloud_firestore/cloud_firestore.dart';
import 'package:cloud_functions/cloud_functions.dart';
import 'package:firebase_auth/firebase_auth.dart';
import 'package:firebase_storage/firebase_storage.dart';
import 'package:flutter/material.dart';
import 'package:flutter/services.dart';
import 'package:shared_preferences/shared_preferences.dart';
import 'package:firebase_core/firebase_core.dart';
import 'firebase_options.dart';
// Custom modules
import 'package:temple/app.dart';

const bool _useEmulator = true;

void main() async {
  //  concrete binding for applications based on the Widgets framewor
  WidgetsFlutterBinding.ensureInitialized();

// Instantiate shared pref
  SharedPreferences prefs = await SharedPreferences.getInstance();
  SystemChrome.setSystemUIOverlayStyle(
    SystemUiOverlayStyle.dark.copyWith(statusBarColor: Colors.black38),
  );
  // Initialize Firebase
  await Firebase.initializeApp(
    options: DefaultFirebaseOptions.currentPlatform,
  );

  // Set app to run on firebase emulator
  if (_useEmulator) {
    await _connectToEmulator();
  }

// Pass prefs as value in MyApp
  runApp(MyApp(prefs: prefs));
}

// Settings for firebase emulator connection
Future _connectToEmulator() async {
  // Provide url to the emulator, localhost might not work on android emulator.
  final host = Platform.isAndroid ? '10.0.2.2' : 'localhost';
  // Provide port for all the local emulator prodcuts
  const authPort = 9099;
  const firestorePort = 8080;
  const functionsPort = 5001;
  const storagePort = 9199;

  // Just to make sure we're running locally
  print("I am running on emulator");

  // Instruct all the relevant firebase products to use firebase emulator
  await FirebaseAuth.instance.useAuthEmulator(host, authPort);
  FirebaseFirestore.instance.useFirestoreEmulator(host, firestorePort);
  FirebaseFunctions.instance.useFunctionsEmulator(host, functionsPort);
  FirebaseStorage.instance.useStorageEmulator(host, storagePort);
}
Start Emulator
To run the firebase emulator type the following command.
// On terminal
firebase emulators:start
When you run your android emulator you should see the "I am running on emulator" message(emulator should be running).
Error: Could not start Firestore Emulator, port taken.
At some point when we accidentally forget to close the port, we'll get an error that the port is already taken. To fix that we have to kill the port.
# Provide the port that has been given in an error message like 8080
npx kill-port 8080
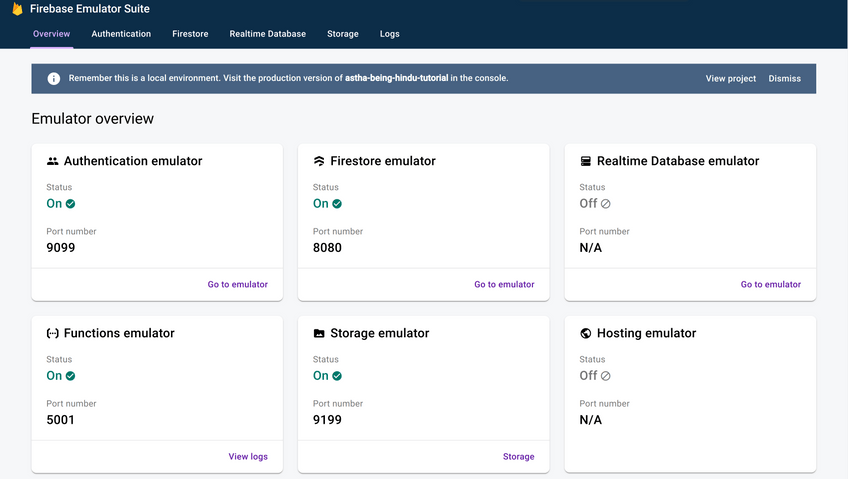
Now, that the active port has been terminated, you can start the emulator again, which will look like the image below.

Summary
In this very short series, we connected our temple app to the Firebase project. Let's retrace our steps, we:
- Created Firebase Project & Firestore DB.
- Installed Firebase CLI & FlutterFire CLI.
- We installed Firestore, Functions, Storage, and Authentication packages.
- We then connected these Firebase products to the cloud Firebase project on Firebase Init.
- During the initialization, we also installed Firebase Emulator and did all the configuration.
- We then wrote a simple and easy function that handles Local Emulator Connection for us.
- Now know how to solve the port unavailable error issue.
Show Support
This is it, we're done with the connection. Now, we can proceed with your development. I hope everything went well for you.
This is Nibesh Khadka, from Khadka's Coding Lounge. Make sure to show support by liking, sharing, and commenting. The next series is where we dive deep into the User Authentication topic so do subscribe to email notifications on publishing.