Improve User Experience in Flutter With Snack Bars, Progress Indicators, and Alert Dialogs
Flutter App Development Tutorial | Part - VIII

I am no longer publishing through HashNode. I have started my own publication Script Portal: https://medium.com/script-portal.
You can also find my video tutorials on my coding Channel: Coding With Nibesh: https://www.youtube.com/@codingWithNibesh
Snack Bars, Alert Dialogs, ProgressIndicators, and similar items are very essential tools to enhance the user experience on an application regardless of platform.
Intro
Welcome to another exciting blog, this is 8th part of the series Flutter App Development Tutorial. So, far we made Splash Screen, some global widgets like the app bar and bottom nav bar, and also implemented a global theme. In the last two sections, we created UI and wrote backend for registration and sign-in methods to use with the Firebase project. In this section, we'll use features from flutters to give visual feedback to users.
You can find the source code from here.
Show Progress Indicator During Registration/Sign In
Head over to auth_state_provider class and make some changes.
Create an enum outside of class, to toggle the Application Process State State.
// Outside of any class or function
// Make an enum to togggle progrss indicator
enum ProcessingState {
  done,
  waiting,
}
Inside of Provider class let's create a field of type ProcessingState and a function that switches these values/states.
  ProcessingState _processingState = ProcessingState.done;
  // getter
  ProcessingState get processingState => _processingState;

  void setPrcState(ProcessingState prcsState) {
    _processingState = prcsState;
    notifyListeners();
  }
We'll display the CircularProgressIndicator whenever the application is busy and remove it when done. For instance, after pressing the register/sign-in button we can display the progress indicator in place of the button and then remove it when firebase sends a response.
So, let's first start by adding the function inside the register function. We'll make changes inside auth_form_widget files after this.
Update Processing State In Register Function
// Our Function will take email,password, username and buildcontext
  void register(String email, String password, String username,
      BuildContext context) async {
    // Start loading progress indicator once submit button is hit
    // #1
    setPrcState(ProcessingState.waiting);
    try {
      // Get back usercredential future from createUserWithEmailAndPassword method
      UserCredential userCred = await authInstance
          .createUserWithEmailAndPassword(email: email, password: password);
      // Save username name
      await userCred.user!.updateDisplayName(username);

      // After that access "users" Firestore in firestore and save username, email and userLocation
      await FirebaseFirestore.instance
          .collection('users')
          .doc(userCred.user!.uid)
          .set(
        {
          'username': username,
          'email': email,
          'userLocation': null,
        },
      );
      // if everything goes well user will be registered and logged in
      // now go to the homepage
      GoRouter.of(context).goNamed(APP_PAGE.home.routeName);
    } on FirebaseAuthException catch (e) {
      // In case of error
      // if email already exists
      if (e.code == "email-already-in-use") {
        print("The account with this email already exists.");
      }
      if (e.code == 'weak-password') {
        // If password is too weak
        print("Password is too weak.");
      }

    // #2
      setPrcState(ProcessingState.done);
    } catch (e) {
      // For anything else
      print("Something went wrong please try again.");
      // #3
      setPrcState(ProcessingState.done);
    }
    // notify listeneres
    notifyListeners();
  }
- In the registration function, we'll start to toggle the ProcessState to waiting(which's done by default) right before the Try block.
- (#2&3) We'll only switch it back to done once the servers send an error response, at the end of the Catch block. We'll not switch it back at the end of the try block because, in case of success, we'll move on to the next page as well as display a Snackbar which we'll implement after this section.
Please make similar changes to the Sign In and the Log Out functions by yourself.
Now, we'll need to tell the application, when the processing state is in waiting, display a progress indicator, and then remove the indicator once the processing state is done. To do so let's head over to auth_form_widget. Right after we instantiate an AuthStateProvider, create a new variable of the type ProcessState whose value is equal to that of AuthStateProvider's process state.
 Widget build(BuildContext context) {
    final AuthStateProvider authStateProvider =
        Provider.of<AuthStateProvider>(context);

    // make new ProcessState var
    ProcessingState prcState = authStateProvider.processingState;
After that, down where we have our elevation button, let's make it a conditionally rendering widget.
  if (prcState == ProcessingState.waiting) const CircularProgressIndicator(),
  if (prcState == ProcessingState.done)
              Row(
                mainAxisAlignment: MainAxisAlignment.end,
                children: [
                  TextButton(
                    onPressed: () {},
                    child: const Text('Cancel'),
                  ),
                  const SizedBox(
                    width: 20,
                  ),
                  ElevatedButton(
                    onPressed: () {
                      // call _submitForm on tap
                      _submitForm(authStateProvider, context);
                    },
                    child: Text(registerAuthMode ? 'Register' : 'Sign In'),
                    style: ButtonStyle(
                      elevation: MaterialStateProperty.all(8.0),
                    ),
                  ),
                ],
              ),
With this, the progress indicator will activate and deactivate at the right time.
Display Information on Snackbar
As mentioned earlier, we'll be using Snackbar to display information like "Authentication Successful", "Welcome Back", etc. To do so let's again create a simple function on AuthStateProvider class.
// Right after setPrcState function
 //  create function to handle popups
  SnackBar msgPopUp(msg) {
    return SnackBar(
        content: Text(
      msg,
      textAlign: TextAlign.center,
    ));
  }
This function will take a custom message and return a SnackBar to display on the screen. Snackbar works in conjunction with ScaffoldMessenger class. So, we'll pass this msgPopUp method in ScaffoldMessenger.of(context) at the end of the try block operations, and just before we call GoRouter.
Inside Registration Function
ScaffoldMessenger.of(context)
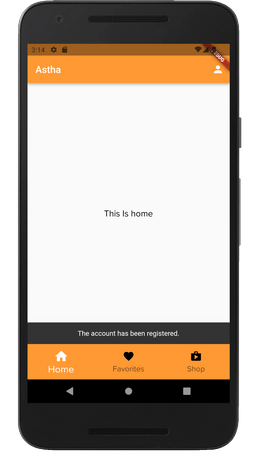
.showSnackBar(msgPopUp("The account has been registered."));
// Before GoRouter
GoRouter.of(context).goNamed(APP_PAGE.home.routeName);
Inside Login Function
ScaffoldMessenger.of(context).showSnackBar(msgPopUp("Welcome Back"));
With this when the authentication operation succeeds user will see a snack bar at the bottom of the application.
Alert Error on Authentication With Alert Dialog
The snack bar is useful because it subtly displays short messages. However, because of its subtlety, it is not very appropriate to be used in case of errors. In such cases, it's better to alert users using a dialog pop-up such as the AlertDialog widget. So, right after the msgPopUp function, let's create another function.
// #1
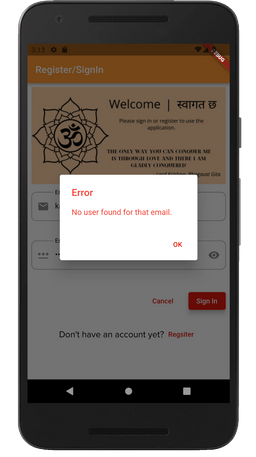
AlertDialog errorDialog(BuildContext context, String errMsg) {
return AlertDialog(
title: Text("Error",
style: TextStyle(
//text color will be red
// #2
color: Theme.of(context).colorScheme.error,
)),
content: Text(errMsg,
style: TextStyle(
//text color will be red
// #3
color: Theme.of(context).colorScheme.error,
)),
actions: [
TextButton(
// On button click remove the dialog box
// #2
onPressed: () => Navigator.of(context).pop(),
child: const Text('OK'),
),
],
);
}
- Our method will take two arguments: an error message and a build context.
- Our alert box will have texts with the color red.
- On click, the dialog box will be removed from the screen. The build context is required here to call Navigator.pop method.
On both registration and sign-in methods, we are only printing the error messages. Now, let's replace those print statements with errorDialog() and pass the same messages into the function.
Inside Register Function's Catch Blocks
on FirebaseAuthException catch (e) {
      // In case of error
      // if email already exists
      if (e.code == "email-already-in-use") {
        showDialog(
            context: context,
            builder: (context) => errorDialog(
                context, "The account with this email already exists."));
      }
      if (e.code == 'weak-password') {
        // If password is too weak
        showDialog(
            context: context,
            builder: (context) =>
                errorDialog(context, "Password is too weak."));
      }
      setPrcState(ProcessingState.done);
    } catch (e) {
      // For anything else
      showDialog(
          context: context,
          builder: (context) =>
              errorDialog(context, "Something went wrong please try again."));
      setPrcState(ProcessingState.done);
    }
This is what the box will look like.
Please, add these alerts to your sign-in method by yourself.

Summary
Few changes were made in AuthStateProvider and AuthFormWidget classes.
- We created an Enum to address process states.
- Progress indicators were implemented based on Processing Status.
- A simple snack bar function was built to display information for users when authentication succeeds.
- An error handler was created to display error messages on an alert dialog box.
Support Us
Was this an informative blog? If so, hit the like button, ask us some questions and share this with your colleagues. The next part is going to be on App Permissions and Google Places API. So, subscribe and follow us to get notifications.
This is Nibesh Khadka from Khadka's Coding Lounge. We are a freelancing agency that makes websites and mobile applications.