Introduction to Application Packages
Nepal, HSEB Course, Class - XI, Chapter 4

I am no longer publishing through HashNode. I have started my own publication Script Portal: https://medium.com/script-portal.
You can also find my video tutorials on my coding Channel: Coding With Nibesh: https://www.youtube.com/@codingWithNibesh
This blog is for Class XI, Computer Science Students, Nepal. The blog is a very brief summary of Chapter 4, of the computer science book by Kriti's Publication. Please read the book for details.
Chapter 4 is more practical than theory, so try to explore MS office tools on your own with the methods shown in the book.
Introduction
An office suite is a collection of applications intended to be used by workers of an organization. These bundled applications can be used for several purposes like creating documents/reports, saving data on Spreadsheets, presentations on slides, sending emails, etc.
Word Processors
Its a software designed to create documents in text formats like applications, resumes, letters, reports, theses, etc. We can create, edit, save, share, and print documents create from this software. It also provides features such as spell and grammar checks; font-related such as size, types, and colors; inserts special symbols used in Mathematics and Sciences, etc.
Some popular word processors are MS(Microsoft) Word, Google Docs, Star Office Writers, etc. In this chapter, we'll be diving deep into MS word.
MS Word
It is a very popular software developed by Microsoft. It is one of the software that comes bundled with Microsoft's office 365 tools but can also be purchased separately.
One of the ways to start the word app is by double-clicking the docs icon. You can also start MS word from the run program in windows. You'll see a window similar to the image below.
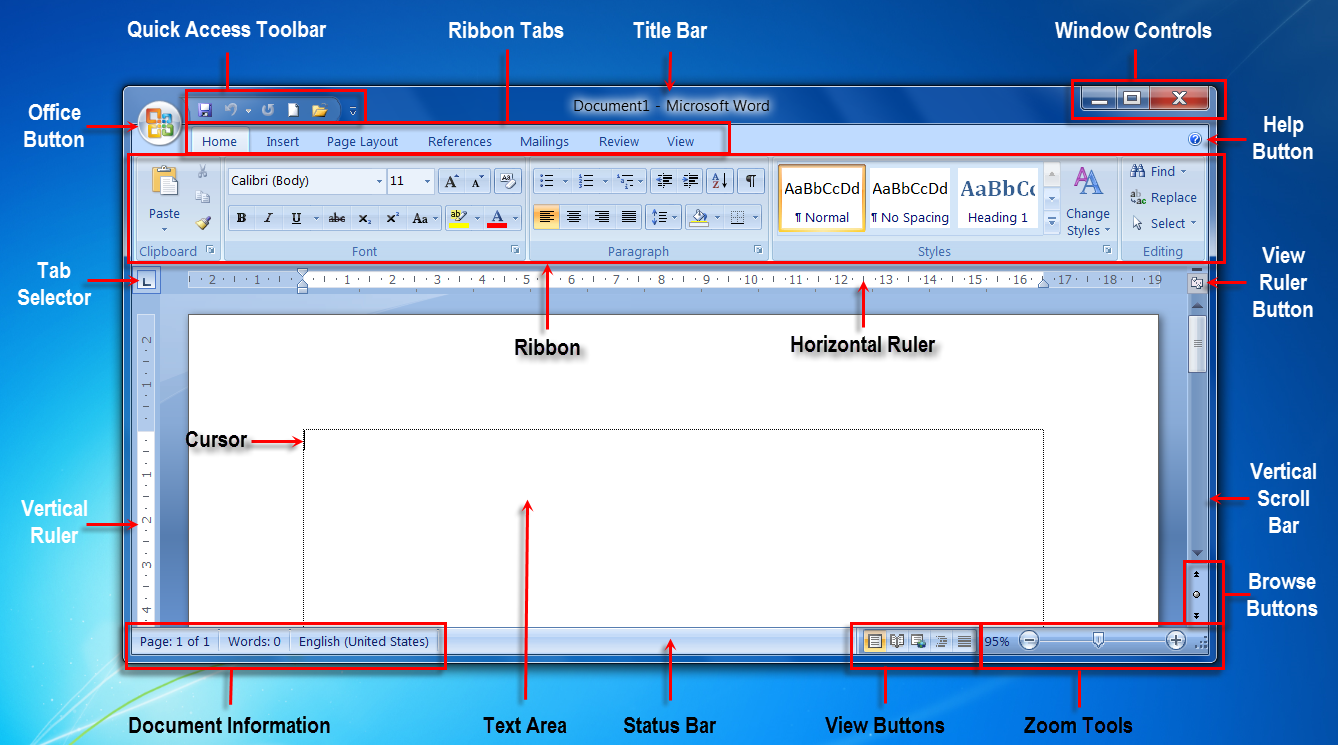
Basic Terms Of Word Processing
Quick Acess Toolbar: As shown in the figure, it's a customizable toolbar with a few commands such as save, back/undo, etc.
Title Bar: A place that shows the file's name/title or simply document1 if you haven't named it yet.
Window Controls: Such as minimize, maximize/restore and close buttons.
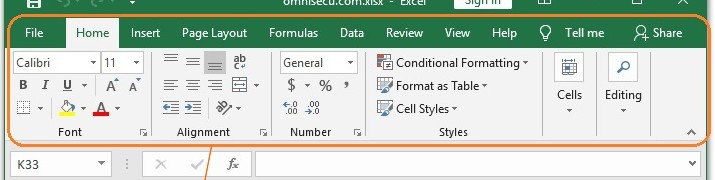
Ribbon: A section consisting of menus and toolbars. It is designed to provide users with quick access to commands to complete tasks. Commands are grouped and ordered logically under tabs.
Tabs/Ribbon Tabs: Tabs organize different commands into groups based on processing activities.
Scrolling Bars: Vertical/Horizontal scroll bars to scroll through documents easily in respective directions.
Rulers: Vertical/Horizontal rulers in Microsoft Word help to see and control page margins, paragraph indents, and more. You can toggle the visibility of the ruler by checking/unchecking the box in View>Ruler(show section).
Working With File Menu
The File menu provides tools to access your files to create, read, update, delete, and print them.
New: Create a new document/File.
Open: Open a file from your directories.
Save: Save the changes in the file.
Save As: Save files with different names and/or formats such as pdf, Docx, etc.
Print: Print the file.
Working and Editing Text
Some keyboard shortcuts in MS word:
Ctrl+N --> Create a new document
Ctrl+O -->Open a document.
Ctrl+S --> Save the document.
Ctrl+W --> Close the document.
Ctrl+X --> Cut the selected content to the Clipboard.
Ctrl+C --> Copy the selected content to the Clipboard.
Check out different shortcuts here.
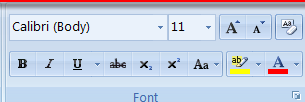
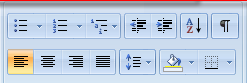
Formatting Characters and Paragraphs
The following image displays the section that can be used to
To change Font Families like Calibri, Sans Serif, Roboto, etc.
To change font size and color.
To change the background color of the image.
Align the paragraphs and head to the center, right, or left.
Create a bullet list like ordered or unordered. etc.
Try the exercises that are mentioned in the book to explore more about MS Word.
Check out this YouTube Tutorial in Hindi To Learn about MS Word.
Indent Paragraphs
Indentation determines the distance of a paragraph from either right or left of the margin. You can increase or decrease the indent of the paragraph, and create an indent on all lines except the first line(hanging indent) with ms word.
You can launch the paragraph window from the home tab, Clicking the bottom-facing arrow button, similar to the image below.

You'll see a dialog box like the image below.
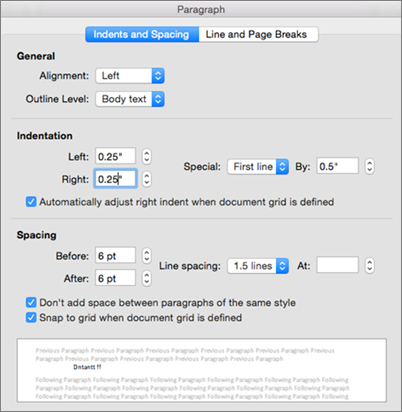
Play with the settings the see the changes.
Check out the book to learn how to:
Insert symbols and equations.
Insert header and footer in the document page.
Formatting pages from the page layout tab.
Provide numbering, and borders on pages.
Insert tables in docs.
Insert Images and Clip art in documents.
Working With Templates
A template determines the basic structure of a document. It contains settings for documents such as fonts, macros, menus, page layouts, styles, etc. Ms word comes with several global templates under the Templates dialog box such as resumes, applications, letters, etc.
You can find free templates at Menu > New.
Performing Mail Merge
Mail merge is the process of combining two or more files/letters/emails. It can be used for mass(multiple) mailings from one letter. It can also be used to print individual mark sheets from the result sheet Excel.
Check out this video from Tutorials Point to learn how to mail merge.
*Please try the exercises mentioned in the book from pages 110-125 and 132-135 *.
Spreadsheets
A spreadsheet is an online document that organizes data in rows and columns. We can apply different mathematical formulas and generate charts and graphs based on data.
There are different types of spreadsheets, for instance, MS Excel, Google Spreadsheets, Apple Numbers, etc. MS Excel which we'll explore further is a product by Microsoft.
MS Excel
Helpful Terms in MS Excel
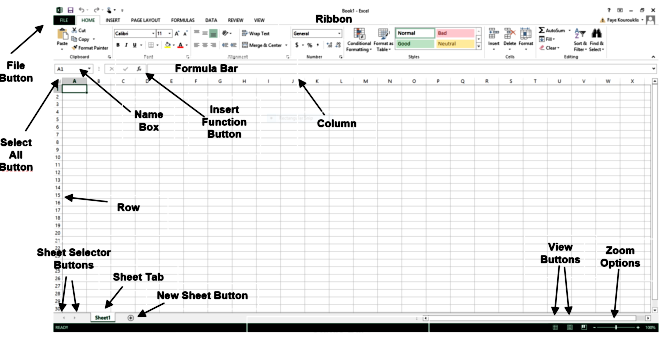
Tabs: Tabs/Sheet tab gives access to select individual spreadsheets/worksheets.
Ribbon Tabs: Ribbon Tab is a tab that organizes commands by topic. The Ribbon is Commands underneath the Tabs
Name Box: Displays cell location and can be used to navigate to a cell location
Select All Button: Selects all the cells in a worksheet
Formula Bar: It's a horizontal bar, sometimes called an fx bar. It displays text or number data in active or current cells, formulas in an active cell, or a range of cells in place of a selected data series in Excel.
Insert Function Button: Displays Insert Function dialog box.
Cell: A cell is a rectangular area formed by the intersection of a column and a row.
Cell Range: It's a collection of multiple continuous cells. Cell Ranges are given as, A1:C23. This means from Column A row 1 to Column C row 23.
Cell References/ Cell Address: Each Cell has its reference. For example, A5 cell means the cell in the 5th row of column A. There are two cell references. They are absolute and relative cell references.
Relative references are given by combining their Column Name and cell numbers like B5, A22, K2, etc. Relative references change when a formula is copied to another cell.
Absolute references, on the other hand, remain constant no matter where they are copied. They are referred to as $A$5, $B$12, etc*
Find more here.
Watch this video from Tutorials Point to learn Excel Basics.
After this, you can explore things on spreadsheets like:
Create Header Row. Add background and font colors, and add wraps.
Try to change the alignments of the column.
You can also try changing the alignment of values in different cells.
Try inserting, merging, and deleting rows and columns.
Database Management System(DBMS)
DBMS is software for creating and managing databases. A DBMS makes it possible for users to create, protect, read, update and delete data in a database. Microsoft offers MS Access as part of Office 365 as a database management system(DBMS). Libre Office comes free with Linux installations and has LibreOffice Base as DBMS.
In this blog, we'll talk more about MS Access.
MS Access
You can open check this article on how to create a new DB with MS Access in very easy steps. You can also follow the following steps:
Start Microsoft Access, click the File tab on the ribbon, and select New.
Type the name of the DB you want to create in the input box and hit enter. Access will display a list of templates that match the term you entered.
Choose a template from the given list
Give a name to your DB.
Click the Create button or the Download button.
After that, access will open up a new window with your DB.
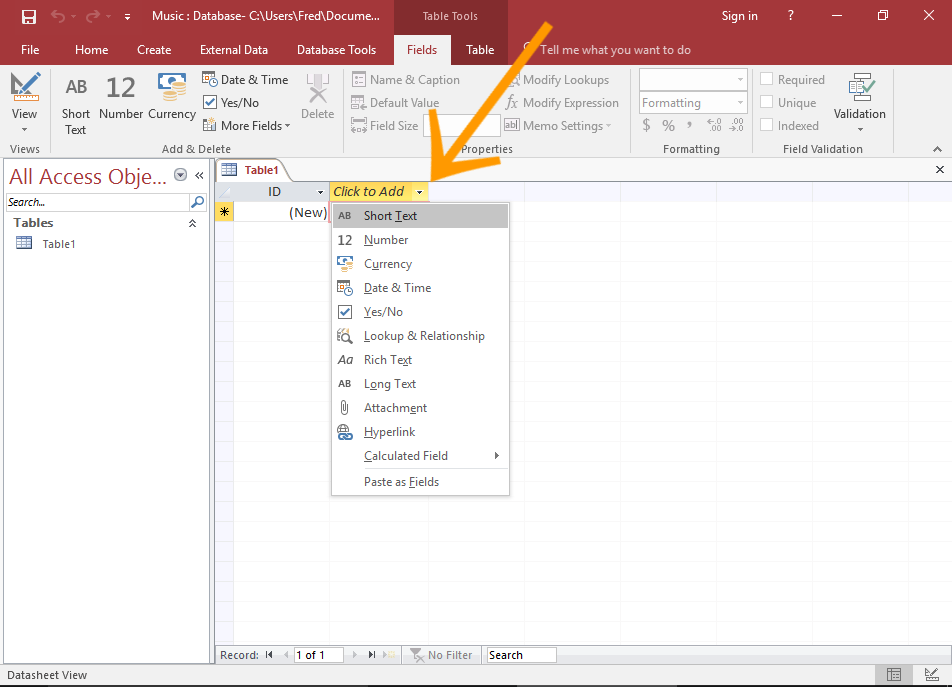
Data Types
In access, data are stored in a table in column and row combination. Each field/column has distinct characteristics. One of them is the data type of the value that the column will hold.
Short Text: It's the combination of strings as well as numbers. However, the numbers won't be used for any calculations like phone numbers, and postal codes in addresses. The maximum length of a short text is up to 255 characters. It's perfect for fields like name, address, gender, etc.
Long Text: Similar to a short text, however, its length can be up to 63,999 characters. It's perfect for values like long paragraphs.
Date/Time: Date and time values from years 100 to 9999.
Other data types are Numbers, Currency, AutoNumbers, and Yes/No booleans. Find about them in the book.
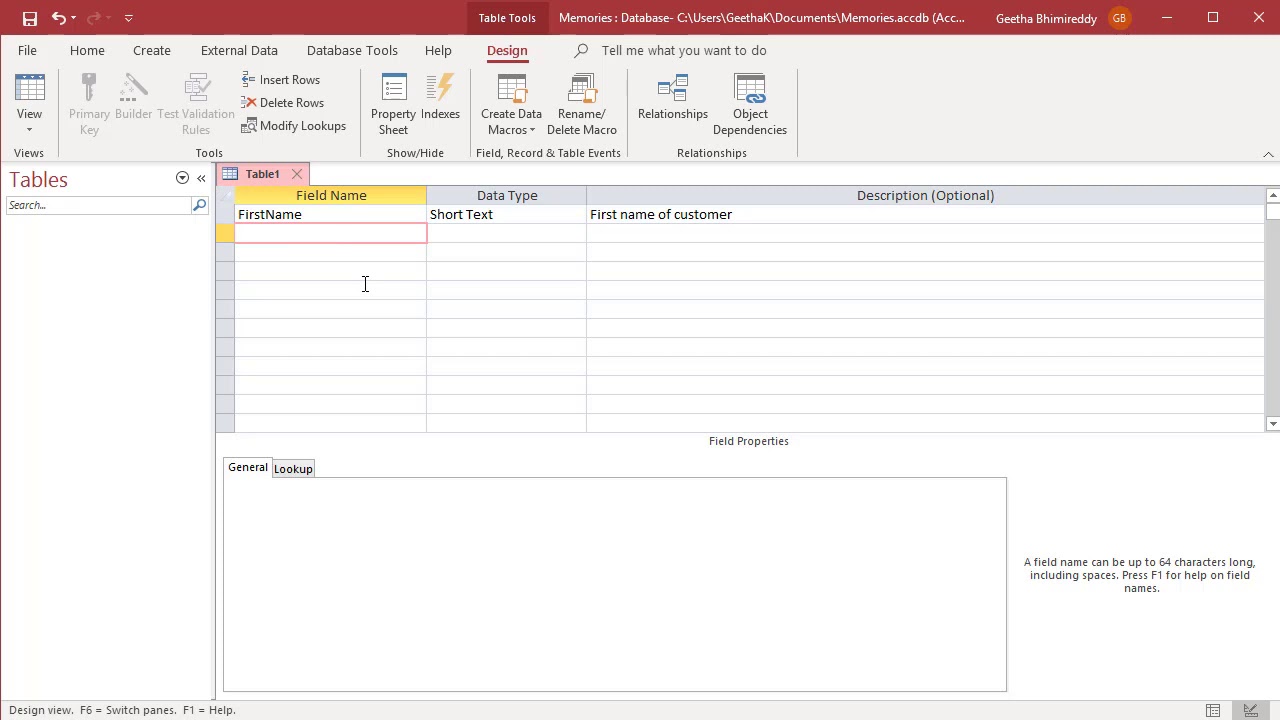
Create Table
Always start your DB design by creating all of its tables. Before creating a table it's better to write down on paper all the tables you might need for your database and also the fields for your tables.
For instance, To create a DB for a retail store what are the tables that are needed?
Inventory table that lists all the items, their quantity, expiration date, time of purchase, etc.
Staff Shift table that has a list of staff names, Unique IDs, Shift days and times, overtime, phone numbers, etc.
Suppliers table that has information on product suppliers to your store such as Organization Name, address, phone number, contact person name, etc.
Transaction table that lists daily transactions in your store.
I'll leave it to your imagination.
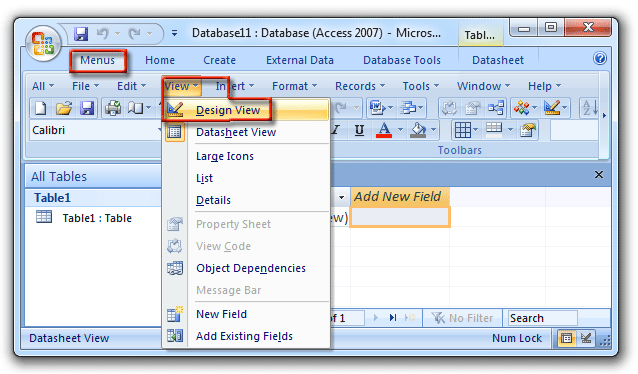
You can create a table in the datasheet view as well as in the design view. Follow the following steps to reach the specific views to create tables.
- Change Views. Image Source
Create a Table in Datasheet View. Image Source
Create a Table in Design View. Image Source
Adding Data
A database is a collection of objects like tables, forms, reports, etc. Now that the table is ready we need to add data to them. You can insert, change, or delete data in the table from MS Access in the datasheet view.
This blog will still see some changes so please have some patience. Thank you for reading.
Find out more blogs in this series here.


