How to Insert Multiple Rows in Google Sheets with Apps Script?
Apps Script Is A tool.

I am no longer publishing through HashNode. I have started my own publication Script Portal: https://medium.com/script-portal.
You can also find my video tutorials on my coding Channel: Coding With Nibesh: https://www.youtube.com/@codingWithNibesh
Hello and welcome to our blog series on automating Google Sheets with Apps Script. In this tutorial, we will guide you on how to insert multiple rows in Google Sheets using a simple script. We'll explore how to use UiApp to create a custom user interface for inserting rows in Google Sheets and how to add dynamic row insertion features to the menu.
Whether you are a beginner or an experienced user, this guide will provide you with step-by-step instructions to help you streamline your workflow and save time.
Adding Dynamic Row Insertion Features with UiApp in Google Sheet
Google Sheets is a powerful tool for managing data, but sometimes users need to insert multiple rows at once. To make this process more efficient, we can use the UiApp class from Apps Script. With UiApp, we can create a simple user interface that allows the user to specify the number of rows they want to insert. However, UiApp has its limitations, such as not being able to create dynamic input for inserting rows above or below. To overcome this limitation, we can add two functions to the menu that will insert rows above or below after asking for the number of rows to enter.
Writing Functions to Insert Multiple Rows in Google Sheets
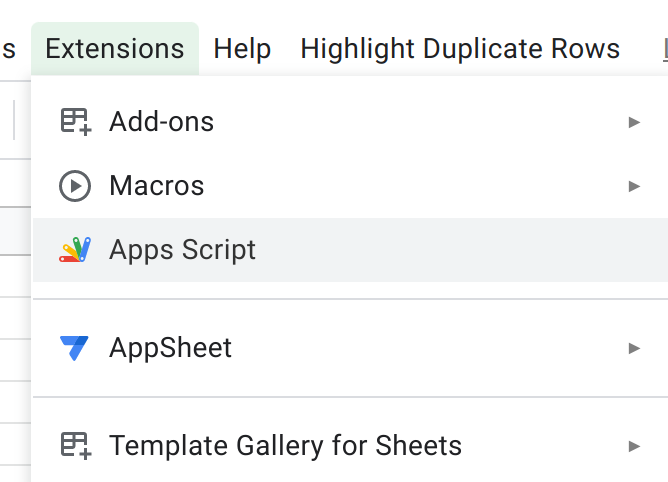
Now, on your spreadsheet, click the Extensions tab and then Apps Script as shown in the image below.
If you're continuing on the previous blog, then create a new script file with a preferred name, I'll call it insert_multiple_rows.
There copy and paste the following codes.
function insertMultipleRowsAbove() {
// get sheet and data
let sheet = SpreadsheetApp.getActiveSheet();
// get selected row
let activeRowIndex = sheet.getActiveRange().getRowIndex();
// get ui
let ui = SpreadsheetApp.getUi();
// ask for number of rows to insert
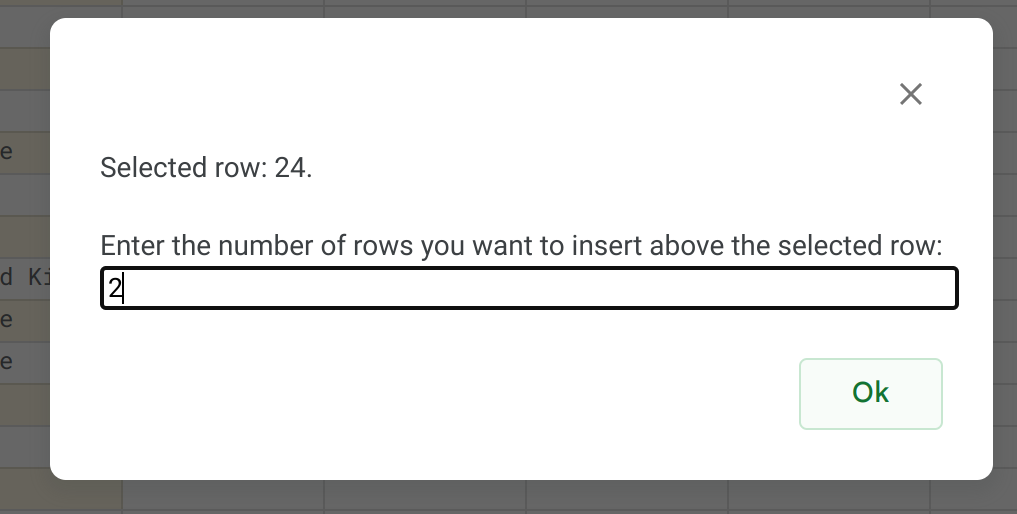
let response = ui.prompt(`Selected row: ${activeRowIndex}.
Enter the number of rows you want to insert above the selected row:`);
// Process the user's response.
if (response.getSelectedButton() == ui.Button.OK) {
let numRows = Number(response.getResponseText());
sheet.insertRowsBefore(activeRowIndex, numRows);
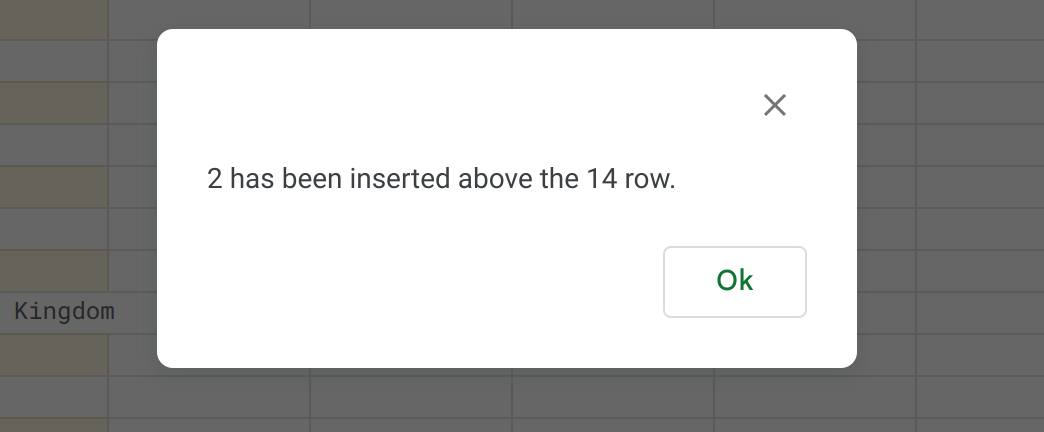
ui.alert(`${numRows} has been inserted above the ${activeRowIndex} row.`);
} else {
ui.alert(`Please press the ok button after you enter the number.`);
}
}
function insertMultipleRowsBelow() {
// get sheet and data
let sheet = SpreadsheetApp.getActiveSheet();
// get selected row
let activeRowIndex = sheet.getActiveRange().getRowIndex();
// get ui
let ui = SpreadsheetApp.getUi();
// ask for number of rows to insert
let response = ui.prompt(`Selected row: ${activeRowIndex}.
Enter the number of rows you want to insert below the selected row:`);
// Process the user's response.
if (response.getSelectedButton() == ui.Button.OK) {
let numRows = Number(response.getResponseText());
sheet.insertRowsAfter(activeRowIndex, numRows);
ui.alert(`${numRows} has been inserted after the ${activeRowIndex} row.`);
} else {
ui.alert(`Please press the ok button after you enter the number.`);
}
}
Here, we created two functions - insertMultipleRowsAbove() and insertMultipleRowsBelow(). Both functions perform almost the same task of asking the user for the number of rows to insert and then inserting them either above or below the selected row index. The only difference between the two functions is the method used to insert the rows - insertRowsBefore() and insertRowsAfter() respectively. These functions will come in handy when you need to insert multiple rows at once, saving you time and effort.
Adding the Insert Multiple Rows Function to the Custom Menu
Now we'll add these two functions to our menu.
Again if you're continuing to the previous blog, then locate the createCustomMenu() function in your files and edit the codes there. And only add one of the following functions in your files per your needs.
// if you're new and only want this feature the use this code
/**
 * OnOpen trigger that creates menu
 * @param {Dictionary} e
 */
function onOpen(e) {
  createCustomMenu();
}

/**
 * Menu creates menu UI in spreadsheet.
 */
function createCustomMenu() {
  let menu = SpreadsheetApp.getUi().createMenu("Insert Multiple Rows"); // Or DocumentApp or SlidesApp or FormApp.

  menu.addItem("Insert Multiple Rows Above", "insertMultipleRowsAbove");
  menu.addItem("Insert Multiple Rows Below", "insertMultipleRowsBelow");
  menu.addToUi();
}
//======================================================//
// if you're continuing the previous blog then add this

/**
 * Menu creates menu UI in spreadsheet.
 */
function createCustomMenu() {
  let menu = SpreadsheetApp.getUi().createMenu("Highlight Duplicate Rows"); // Or DocumentApp or SlidesApp or FormApp.

  menu.addItem("Highlight Duplicate Row", "colorDuplicateRows");
  menu.addItem("Delete Duplicate Row", "deleteDuplicateRows");
  menu.addItem("Reset Colors", "colorReset");
  menu.addItem("Insert Multiple Rows Above", "insertMultipleRowsAbove");
  menu.addItem("Insert Multiple Rows Below", "insertMultipleRowsBelow");
  menu.addToUi();
}
From here, similar to the previous blogs, you can now just:
Save the code.
Reload the spreadsheet.
And execute the function.
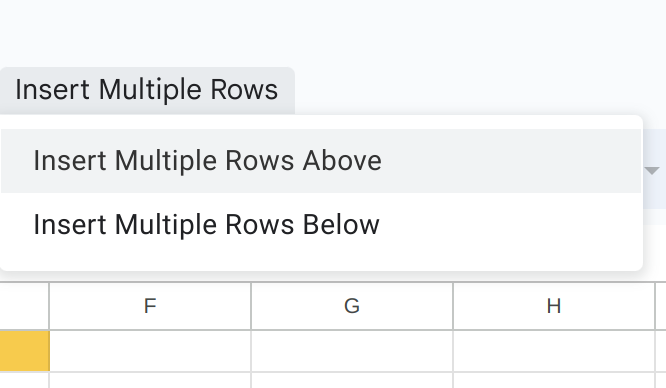
You'll see the respective menus and titles depending on the codes you choose above.
Executing The Function
Here are a few images to guide what the operation will look like in your sheet.
Thank You for Your Time
My name is Nibesh Khadka, and as a freelance automation expert, I specialize in automating Google products with Apps Script. If you need my services let me know.
Don’t forget to like and share this blog.


